Skip to documentation content
USATII MEDIA/Oasis

Enterprise Documentation

18 chapters • 4 learning paths
Your customer manual for OASIS. We explain how the platform is organized, how new enterprises get started, how each workspace can (and should) be used, and where governance, provider, security, buyer-review, and Oasis assurance evidence live.

Licensed-user training

Role-based learning paths

Follow task-focused lessons, return to unfinished work, and keep completion attached to your Oasis account.

Sign in to track progress

Guided product education

Learn the operating model before your team is in the queue.

Documentation is organized like a buyer and operator path: start with workspace setup, then move through access, publishing, response, reporting, evidence, and readiness.
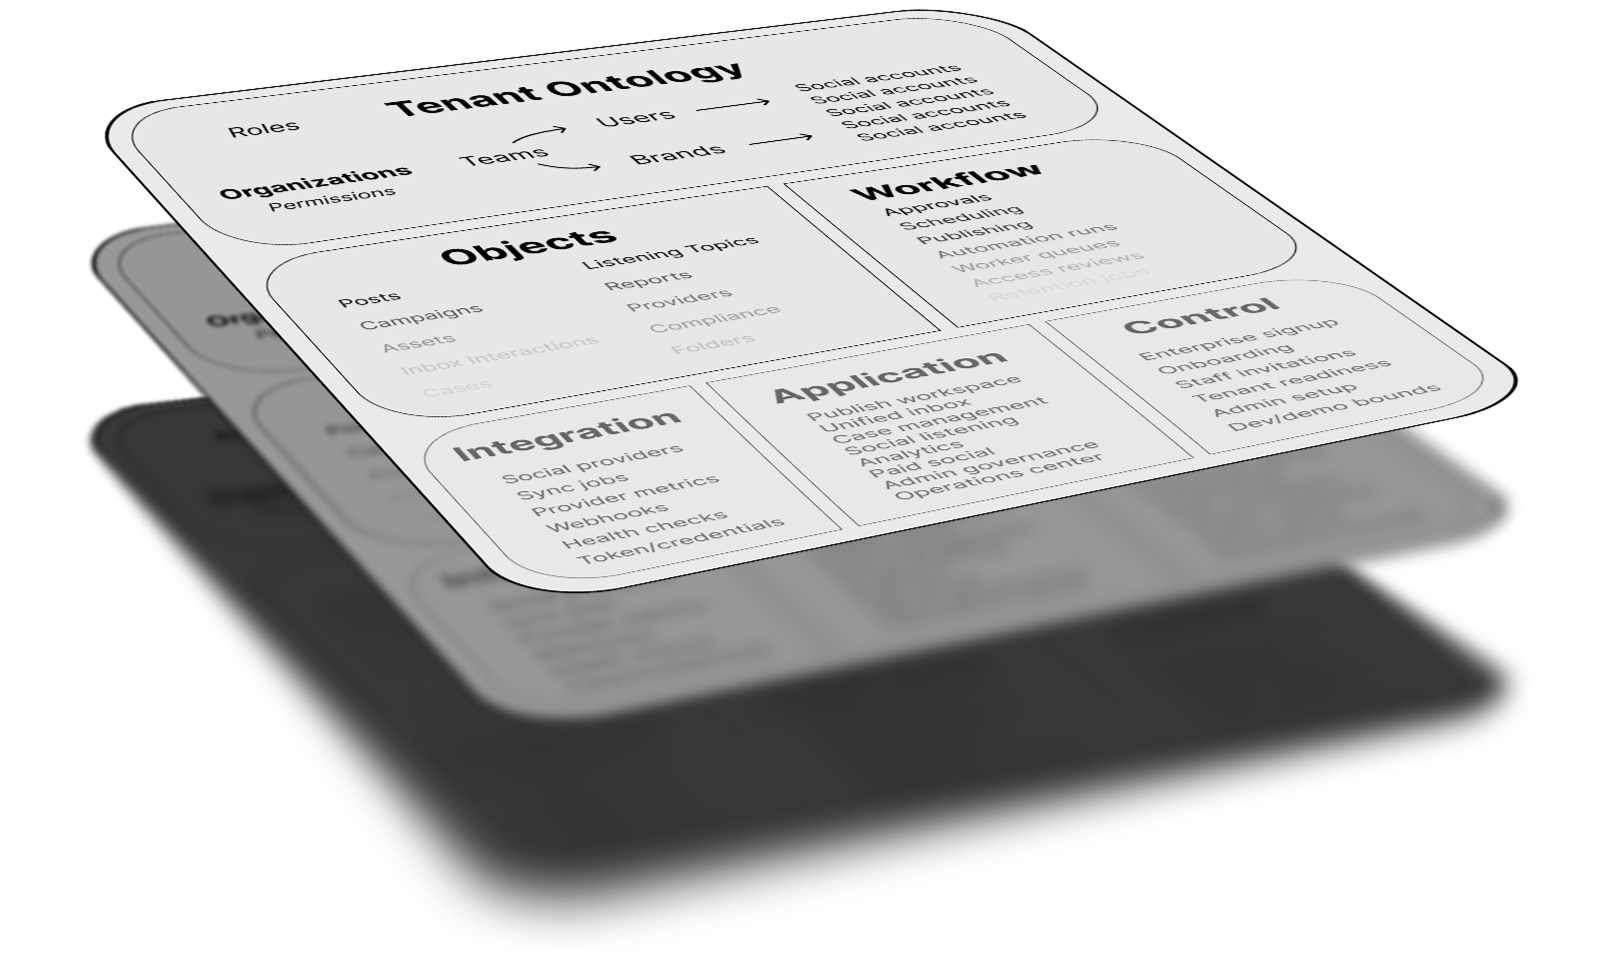
Oasis tenant ontology diagram used as a documentation guide visual.

Role-based documentation guide

Start with the chapter path for your role, then follow setup, permissions, publishing, inbox, reporting, and evidence workflows in order.

Start with this sequence

OASIS is easier to understand when you follow the same order the system expects: create a tenant, model the organization, assign access, connect providers, operate from scoped workspaces, then review evidence.

  1. 1

    Create the workspace

    Complete enterprise signup, confirm the first admin account, and review the workspace profile before inviting staff.

  2. 2

    Invite the team

    Invite staff early, assign scoped roles, and confirm each person can reach the workspaces they need.

  3. 3

    Model the organization

    Add business units, brands, teams, and social accounts so every post, case, report, and approval has a clear owner.

  4. 4

    Connect channels

    Connect social channels, verify account health, and keep unsupported provider actions visible to operators.

  5. 5

    Operate from the right workspace

    Use the workspace that matches the job: Publishing, Inbox / Cases, Listening / Analytics, Admin / Governance, or Command Center.

  6. 6

    Review operations

    Use approvals, audit history, access reviews, provider status, and reports to understand what happened in the social workspace.

Read by role

Choose the path that matches your job. Every path links back to the same chapters, so teams can share a common vocabulary while reading different parts first.

01Everyone

Platform overview

OASIS organizes enterprise social media operations into governed workspaces for publishing, response, listening, analytics, provider setup, accessible content, security administration, and operational review.

What this means

  • The left rail contains the permanent workspaces: Command Center, Onboarding, Publishing, Inbox / Cases, Listening / Analytics, and Admin / Governance.
  • Each workspace has one main job, so users can find the right tool without reading internal setup notes.
  • Most records belong to an organization and may also belong to a business unit, brand, team, or social account.
  • When a capability is unavailable, the interface should explain whether the issue is permissions, setup, account health, or provider support.

How to operate it

  1. Start in Command Center to see readiness, notifications, and the fastest route to the work you need.
  2. Choose Documentation when you need product guidance and Help when you need commands or configuration support.
  3. Use workspace filters before reviewing sensitive posts, cases, reports, or account information.
  4. Share request IDs and visible error messages with your support team when something does not work as expected.

Accessibility checks

  • Use keyboard navigation to reach the left rail, top bar controls, workspace tabs, and primary tables.
  • Confirm visible focus moves in the same order as the page content.
  • Use meaningful workspace names and record titles so screen reader users can identify context.
  • Keep zoom at 200 percent usable without horizontal scrolling outside wide data tables.

Guardrails

  • Do not treat unsupported provider actions as available just because a local record exists.
  • Do not use screenshots alone when the platform has audit history or exportable evidence.
  • Do not share accounts between staff members.
  • Do not describe operational governance as a certification or audit-preparation service.

02Workspace admins

Workspace onboarding

Onboarding turns a new enterprise workspace into a usable operating environment by collecting organization details, inviting staff, modeling the operating structure, importing starter data, connecting accounts, and handing users to the dashboard.

What this means

  • The workspace profile identifies the organization, administrator, operating model, channels, and support contacts.
  • Team invitations are a first step because enterprise social work depends on scoped collaboration.
  • Starter imports can add staff, business units, brands, teams, social accounts, response templates, listening topics, and planned content.
  • Readiness checks show what is complete, what is blocked, and what can be deferred with an explanation.

How to operate it

  1. Complete the two-step workspace setup form with organization details and operating profile.
  2. Invite the first teammates before moving deep into channel setup.
  3. Add at least one business unit, brand, and social account so the dashboard has real operating context.
  4. Run initialization, review readiness, and enter the dashboard when the setup criteria are satisfied.

Accessibility checks

  • Every setup field must have a visible label and clear error text.
  • Progress indicators must not rely on color alone; the current step should include text and state.
  • Invite and import results should be announced as plain text, not only icon changes.
  • Manual invitation links should be easy to select and copy without pointer-only interaction.

Guardrails

  • Do not skip team invitations for an enterprise workspace unless the readiness screen records the deferral.
  • Do not import staff without valid work emails and role assignments.
  • Do not connect accounts to the wrong brand or business unit.
  • Do not enter the dashboard with missing operating structure unless the blocker is intentionally deferred.

03Admins and security reviewers

Identity, sessions, and access

Identity and access controls help administrators decide who can sign in, what each person can do, and which organization, business unit, brand, or account each action belongs to.

What this means

  • Each user has a membership in the organization and one or more scoped role assignments.
  • Roles grant specific permissions such as managing users, approving posts, publishing posts, exporting reports, or managing automation.
  • Sessions represent signed-in users and should be revoked or rotated when access changes or risk is detected.
  • Access decisions should be visible enough for admins and support staff to explain why a control is disabled.

How to operate it

  1. Use Admin / Governance to review users, status, roles, permissions, default scope, and account access.
  2. Create custom roles only when built-in roles do not match a real job responsibility.
  3. Disable users who leave the organization and preserve their history for review.
  4. Run access reviews on a regular schedule and before major staffing changes.

Accessibility checks

  • User and role tables need row headers, visible status text, and keyboard-accessible actions.
  • Permission labels should be written in plain language, not only as internal keys.
  • Errors for denied access should include the missing permission or setup requirement.
  • Session and access review evidence should be exportable in formats reviewers can read with assistive technology.

Guardrails

  • Do not give publishing permission to users who only need to draft or review content.
  • Do not use broad organization-wide grants when a brand or account-scoped grant is enough.
  • Do not delete access history to hide an old mistake.
  • Do not rely on shared inboxes or shared admin credentials for accountability.

04Enterprise admins

Tenant model and governance

The tenant model describes how an organization is structured inside OASIS: business units, brands, teams, social accounts, users, roles, approvals, and evidence all need clear ownership.

What this means

  • The organization is the top-level workspace boundary.
  • Business units represent departments, programs, divisions, or other operating groups.
  • Brands represent public-facing identities, campaigns, programs, or entities that own content.
  • Social accounts connect channels to brands and determine where publishing, inbox, listening, and reporting records belong.

How to operate it

  1. Create business units before assigning users and accounts.
  2. Create brands and map each brand to the correct business unit.
  3. Assign teams and account owners so responsibility is clear during approvals and escalations.
  4. Use access reviews and audit exports to confirm the model still matches the organization.

Accessibility checks

  • Use clear names for business units, brands, and teams so abbreviations do not block understanding.
  • Keep organization selectors labeled and keyboard reachable.
  • Show selected organization, business unit, brand, and account as text in the top bar.
  • Avoid relying on color alone to show active scope.

Guardrails

  • Do not move records across organization boundaries.
  • Do not leave social accounts unassigned after launch.
  • Do not hide governance issues with global filters.
  • Do not let a brand owner manage unrelated brands without an explicit grant.

05Operators and managers

Command Center

Command Center is the operating front door for daily work. It shows readiness, notifications, global filters, quick actions, and links into the workspaces users need most.

What this means

  • Readiness cards show whether the workspace is ready for real operations.
  • Notifications call attention to assigned work, setup issues, and operations that need review.
  • Global filters let users narrow the dashboard by organization, business unit, brand, and account.
  • Quick actions should only appear when the user has the required permission and setup context.

How to operate it

  1. Check notifications and readiness before starting daily work.
  2. Set filters to the business unit, brand, or account you are responsible for.
  3. Use quick actions to create posts, review cases, inspect providers, or open onboarding tasks.
  4. Open Documentation from the rail when you need guidance for a workspace.

Accessibility checks

  • Search, filters, create actions, notifications, Help, and Documentation need consistent heights and focus states.
  • Notification counts should be text-readable and not conveyed only by badges.
  • Drawer controls should trap focus while open and return focus when closed.
  • Keyboard users should be able to reach every top bar control in a predictable order.

Guardrails

  • Do not use Command Center as a substitute for detailed workspace review.
  • Do not assume hidden actions are broken; they may be blocked by permission or setup.
  • Do not ignore readiness warnings before entering live operations.
  • Do not use filters to conceal unresolved risk.

06Creators, approvers, and publishing managers

Publishing operations

Publishing manages drafts, assets, target accounts, validation, approvals, scheduling, publication attempts, retries, and post history.

What this means

  • Posts move through visible states such as draft, submitted, approved, scheduled, published, failed, duplicated, and archived.
  • Targets connect a post to one or more social accounts and provider capabilities.
  • Validation checks content, assets, account readiness, accessibility metadata, and provider support before publishing.
  • Timeline and version history help reviewers understand how content changed.

How to operate it

  1. Create a draft with the right campaign, brand, account target, and assets.
  2. Validate the post before approval or scheduling.
  3. Submit for approval when your role requires review.
  4. Review publish status and retry failed jobs through the documented retry workflow.

Accessibility checks

  • Post composer fields must have labels, helper text, and clear validation messages.
  • Validation results should list each issue in text, not only icons.
  • Approval and publish controls should remain keyboard accessible.
  • Scheduled dates and times should include timezone context.

Guardrails

  • Do not publish content without required alt text or caption metadata.
  • Do not bypass approval because a provider target is available.
  • Do not assume every provider supports the same media, link, or caption rules.
  • Do not retry failed publishing outside the tracked workflow.

07Creators, brand managers, and accessibility reviewers

Digital asset library

The asset library stores approved media and supporting materials with metadata, rights information, usage history, accessibility fields, and publishing relationships.

What this means

  • Assets can include images, video, captions, text snippets, templates, PDFs, and brand files.
  • Metadata describes ownership, brand, folder, collection, tags, rights, approval status, and usage.
  • Alt text and caption status are part of asset readiness.
  • Restricted assets require explicit visibility and should not appear broadly.

How to operate it

  1. Upload assets, confirm the upload, and complete metadata before use.
  2. Add tags, folders, and collections so teams can find approved material.
  3. Approve or reject assets before attaching them to posts.
  4. Review usage history before archiving, replacing, or reusing important assets.

Accessibility checks

  • Images need meaningful alt text before publication.
  • Videos need captions or a documented caption status before use.
  • Asset status, rights, and restrictions should be visible as text.
  • File inputs and download controls should work without pointer-only gestures.

Guardrails

  • Do not publish media with missing accessibility metadata when it is required.
  • Do not use assets after rights expire.
  • Do not expose restricted assets to broad roles.
  • Do not archive an asset before checking where it is used.

08Campaign managers and paid media reviewers

Campaign planning and paid social

Campaign planning connects briefs, goals, content calendars, assigned accounts, post plans, KPIs, budget review, and paid social planning in one governed surface.

What this means

  • Campaigns connect organic planning, publishing work, audiences, assigned accounts, and reporting goals.
  • Paid social surfaces show accounts, campaigns, budgets, performance snapshots, alerts, and planning rules.
  • Paid social planning can be useful even when live provider buying is not enabled.
  • Budget and optimization decisions need clear review before provider-side changes are made.

How to operate it

  1. Create the campaign brief, audience, goals, owner, assigned accounts, and planned content.
  2. Link planned posts to campaign calendar items.
  3. Review paid performance snapshots and budget alerts before changing plans.
  4. Use local planning records for governance until live buying has been approved.

Accessibility checks

  • Budget and performance numbers should include labels, units, and dates.
  • Charts or trend summaries need nearby text equivalents.
  • Campaign status should be readable without relying on color alone.
  • Budget review controls should be reachable and understandable by keyboard.

Guardrails

  • Do not claim provider-side ad buying is connected until it is approved and visible.
  • Do not apply budget changes without documented review.
  • Do not mix organic publishing approval with paid media approval unless your policy allows it.
  • Do not treat stale performance snapshots as current results.

09Community, support, and escalation teams

Unified inbox and case management

Inbox and cases help teams triage comments, messages, mentions, assignments, internal notes, watchers, saved replies, escalations, timelines, and resolution history.

What this means

  • Inbox interactions represent incoming community or social engagement.
  • Cases are used when an item needs ownership, escalation, investigation, or follow-up.
  • Assignments, notes, watchers, attachments, and timeline events preserve context.
  • Saved replies and response templates help teams respond consistently.

How to operate it

  1. Filter inbox items by account, status, owner, severity, source, or due date.
  2. Assign interactions or create cases when a response needs accountability.
  3. Use internal notes for context and public replies only for appropriate content.
  4. Resolve or archive cases with a clear reason and retained history.

Accessibility checks

  • Message bodies, contacts, handles, and case titles should be text-readable in tables.
  • Assignment and escalation controls should identify the selected case or interaction.
  • Saved reply insertion should not move focus unexpectedly.
  • Status changes should be announced with readable confirmation text.

Guardrails

  • Do not put private data into public replies.
  • Do not close cases without the required resolution context.
  • Do not assume every provider supports every engagement action.
  • Do not move sensitive escalations into untracked private channels.

10Analysts, communicators, and leadership

Listening, analytics, and reporting

Listening and analytics help teams monitor topics, review mentions, track trends, prepare reports, export results, schedule delivery, and share approved evidence.

What this means

  • Listening topics define keywords, hashtags, sources, thresholds, owners, and alert behavior.
  • Mentions can become cases or evidence when they require action.
  • Reports summarize campaign, account, engagement, trend, and governance information.
  • Exports and share links preserve review history and access controls.

How to operate it

  1. Create listening topics for campaigns, policy issues, reputation risks, or support themes.
  2. Review mentions and trends before creating cases or alerts.
  3. Build saved reports for repeated leadership, campaign, service, or performance reviews.
  4. Export reports through the platform workflow so access and audit history remain intact.

Accessibility checks

  • Report tables should include clear column headers and row labels.
  • Trend summaries need text equivalents for charts or visual indicators.
  • Export formats should preserve headings, reading order, and meaningful labels.
  • Alert severity should be communicated with text, not only color.

Guardrails

  • Do not treat provider metrics as complete when account health is limited or stale.
  • Do not share report links outside approved access controls.
  • Do not use automation as the only review step for high-risk topics.
  • Do not remove context needed to understand a trend or mention.

11Advanced operators and governance admins

Automation and AI assistance

Automation and AI assistance can reduce repetitive work, but they must preserve human review, evidence, accessible outputs, and policy controls.

What this means

  • Automation rules can tag, assign, create cases, route approvals, schedule reports, create exports, and record evidence.
  • Rules should be previewed before they affect live work.
  • AI assistance is for drafts, summaries, alt text support, and review preparation when enabled by policy.
  • Human approval remains required for external communications when policy requires it.

How to operate it

  1. Start automation with low-risk tagging, assignment, and alert rules.
  2. Preview rules against real records before enabling them.
  3. Review execution history after each automated action.
  4. Use AI assistance to prepare text, then review and approve before publishing or responding.

Accessibility checks

  • AI-assisted text must be reviewed for plain language and accessibility before use.
  • Generated alt text must be checked by a human before publication.
  • Automation results should be readable as text in execution history.
  • Users need a visible way to identify when content was AI-assisted.

Guardrails

  • Do not let automation hide work from owners.
  • Do not let AI bypass response templates, approvals, or retention policy.
  • Do not automate external provider actions without explicit approval controls.
  • Do not use AI outputs as final accessibility evidence without human review.

12Admins, operators, and support

Provider integrations and operations

Provider integrations connect social channels to OASIS while showing account health, permissions, connection status, supported actions, and operation history.

What this means

  • Providers have definitions, supported actions, required scopes, account connections, health checks, metrics, and operation history.
  • A connection can be live, sandbox, manual, limited, disconnected, or unsupported depending on setup and provider capability.
  • Credential details should be represented as safe status, never as visible secrets.
  • Provider limitations should remain visible to operators so they know what can and cannot happen.

How to operate it

  1. Connect channels from onboarding or Admin / Governance.
  2. Review account health before publishing, responding, or reporting.
  3. Reconnect accounts when permissions expire or a provider reports degraded health.
  4. Review provider operations after publish, sync, refresh, reconnect, or revoke actions.

Accessibility checks

  • Connection mode, health, and credential status should be readable text.
  • OAuth or reconnect buttons should describe which provider they affect.
  • Provider tables need headers for connection, provider, mode, status, health, credential, and last sync.
  • Failure messages should explain the next action without exposing secrets.

Guardrails

  • Do not expose raw access tokens, refresh tokens, passwords, or client secrets.
  • Do not assume every provider supports every action.
  • Do not publish or respond through an unhealthy connection.
  • Do not ignore provider rate limits, expired permissions, or unsupported-action warnings.

13Workspace administrators and security operators

Security administration

Security administration helps teams govern access to Oasis, review important activity, manage retention settings, and investigate operational incidents inside their social workspace.

What this means

  • Audit history records important changes to access, content, cases, reports, provider operations, and compliance settings.
  • Retention policies and legal holds help explain how records should be kept.
  • Access reviews help administrators confirm that Oasis users and roles still match job responsibilities.
  • Security settings here govern use of Oasis; they do not operate a customer compliance program.

How to operate it

  1. Review user access and sensitive permissions in Admin / Governance.
  2. Run access reviews and retain the results.
  3. Review retention policy status before deleting, archiving, or exporting records.
  4. Use incident and audit history when documenting operational security events.

Accessibility checks

  • Audit and access review exports should preserve headings, tables, and readable timestamps.
  • Compliance status must include text labels in addition to icons or colors.
  • Legal hold and retention controls need clear warnings before changes are saved.
  • Security exports should use descriptive names.

Guardrails

  • Do not delete operational records subject to an active legal hold or retention requirement.
  • Do not store secrets in documentation, screenshots, or support messages.
  • Do not weaken access controls to make a workflow faster.
  • Do not represent Oasis administration features as a compliance certification service.

14Platform admins and operations leads

Operations and readiness

Operations and readiness help teams understand workspace health, job status, incidents, releases, report delivery, provider activity, and operational evidence before relying on the platform for daily work.

What this means

  • Readiness summarizes whether the workspace has enough structure, staff access, channels, and health evidence for real work.
  • Operational history shows completed, skipped, failed, retried, or cancelled background work in user-readable terms.
  • Incidents capture operational problems and resolution history.
  • Release readiness evidence helps admins decide whether a change is ready for production use.

How to operate it

  1. Review readiness after onboarding and before inviting larger teams.
  2. Check operations history when publishing, reports, provider sync, or automation does not behave as expected.
  3. Record incidents when a platform problem affects users or external communications.
  4. Use readiness information during workspace launch and operational reviews.

Accessibility checks

  • Health and readiness statuses should include text and time context.
  • Incident timelines should be readable in chronological order.
  • Retry, verify, and refresh controls should have descriptive labels.
  • Operational evidence should remain usable at high zoom and with keyboard navigation.

Guardrails

  • Do not treat a successful login as proof that every workspace capability is ready.
  • Do not ignore failed or skipped operations that affect public communications.
  • Do not communicate incident status outside the platform without preserving internal evidence.
  • Do not rely on undocumented manual fixes for recurring operational issues.

15Buyers, legal reviewers, and security reviewers

Evaluating Oasis

Oasis publishes product, security, privacy, accessibility, implementation, support, and pricing materials so prospective customers can evaluate Oasis during procurement and vendor review.

What this means

  • Trust materials describe Oasis's own security and privacy posture.
  • Accessibility materials describe the current state of the Oasis product, including its VPAT/ACR status and documented limitations.
  • Capability and implementation materials help buyers compare Oasis with their requirements.
  • SOC 2 and ISO 27001 references always describe Oasis's own assurance status.

How to operate it

  1. Review the Oasis capability statement and product documentation.
  2. Review Oasis security, privacy, and accessibility materials in the Trust Center.
  3. Confirm implementation scope, support terms, and pricing with the Oasis team.
  4. Request current assurance reports directly from Oasis when access is restricted.

Accessibility checks

  • Buyer materials should include headings, meaningful link text, and readable tables.
  • Oasis accessibility materials should name their scope, date, and current limitations.
  • Product screenshots should be paired with text summaries.
  • Published review materials should support assistive technology.

Guardrails

  • Do not overstate planned or partial Oasis features.
  • Do not claim an Oasis certification that has not been independently completed.
  • Do not describe Oasis as certifying or preparing customer organizations for certification.
  • Do not include customer-specific private details in public product documentation.

16Content teams, accessibility reviewers, and rollout leads

Accessible product and content workflows

Oasis works toward Section 508 and WCAG 2.2 AA accessibility for its own product while helping social teams publish content with alt text, captions, and other required accessibility metadata.

What this means

  • Accessibility checks should cover keyboard access, focus order, screen reader labels, color contrast, responsive layout, captions, alt text, and readable exports.
  • Content accessibility includes alt text, captions, plain-language response templates, accessible PDFs, and review evidence.
  • Mobile readiness means key workflows remain usable on smaller screens without hiding required context.
  • Training helps staff use accessible publishing workflows consistently.

How to operate it

  1. Review accessibility checks before rollout and after meaningful UI changes.
  2. Confirm assets have alt text and videos have captions before publication.
  3. Use onboarding and training to teach the required workflow.
  4. Report product accessibility barriers to Oasis and document content exceptions within the relevant social workflow.

Accessibility checks

  • Test core workflows with keyboard only: sign in, invite staff, create post, approve post, respond to case, export report, and review audit history.
  • Check screen reader names for buttons, inputs, navigation, filters, status badges, and table actions.
  • Confirm color contrast meets WCAG 2.2 AA for text, controls, focus states, and status indicators.
  • Verify forms identify errors with text and focus guidance.

Guardrails

  • Do not treat visual polish as accessibility compliance.
  • Do not use color as the only way to communicate state.
  • Do not publish public content without required accessibility metadata.
  • Do not confuse content checks with a claim that either the customer organization or every published item is certified.

17Workspace owners and launch leads

Launch readiness

Launch readiness is the customer-facing checklist for deciding whether an enterprise workspace is ready for real staff, real channels, real content, and real review obligations.

What this means

  • A launch-ready workspace has an owner, staff access, operating structure, social accounts, provider status, onboarding completion, and evidence review.
  • Email delivery should work before teams rely on invitations or sign-in codes.
  • Provider setup should show which channels are connected, limited, manual, or unsupported.
  • Admins should understand which live actions are available and which remain blocked by policy or provider support.

How to operate it

  1. Create a test staff invitation and confirm the recipient can accept it.
  2. Sign out and sign back in with a one-time code before inviting broad teams.
  3. Confirm the first business unit, brand, team, and social account appear in dashboard filters.
  4. Run a small readiness review: create a draft, attach an asset, validate it, assign a case, generate a report, and review audit history.

Accessibility checks

  • Include accessibility checks in the launch checklist, not only security checks.
  • Verify sign-in, onboarding, dashboard navigation, and report export at 200 percent zoom.
  • Confirm staff can complete setup tasks without mouse-only interactions.
  • Document any accessibility exceptions before launch.

Guardrails

  • Do not launch with only the first admin tested.
  • Do not invite broad teams before sign-in, invitations, and role scopes are verified.
  • Do not enable external communications until approval and provider status are understood.
  • Do not treat unresolved readiness blockers as cosmetic issues.

18Oasis buyers, customer security teams, and assurance reviewers

Oasis security and compliance posture

SOC 2 and ISO 27001 references describe Oasis's own security controls, assurance roadmap, and certification status. Oasis does not perform compliance programs or certification preparation for customer organizations.

What this means

  • Oasis's assurance scope and status must be stated precisely and kept current.
  • Oasis operational safeguards include access control, logging, incident response, supplier management, and change oversight.
  • Customer-facing trust materials explain how Oasis protects the service and customer data.
  • Independent reports or certifications are shared only when they actually exist and subject to appropriate access terms.

How to operate it

  1. Review the current Oasis security overview and Trust Center materials.
  2. Confirm the stated scope and date of any Oasis audit report or certification.
  3. Use Oasis product controls to administer access and activity within your workspace.
  4. Contact Oasis for current restricted assurance materials when required for vendor review.

Accessibility checks

  • Keep Oasis trust materials in accessible formats with headings, labels, and readable tables.
  • Ensure published assurance summaries can be reviewed with assistive technology.
  • State the accessibility scope and limitations of Oasis materials clearly.
  • Provide an accessible request path for restricted reports.

Guardrails

  • Do not claim SOC 2 or ISO 27001 completion before Oasis has completed the applicable independent process.
  • Do not imply that Oasis certifies customer organizations.
  • Do not turn Oasis operational logs into a customer compliance-management product claim.
  • Do not leave the scope, date, or limitations of Oasis assurance statements ambiguous.